
1.3.5. Graphic interface
The application has a graphical interface in which it can be configured quickly and easily.
To download the application, select the connector of your convenience by clicking on the download icon.

Once you download the application, unzip the content preferably to a folder in the root directory.
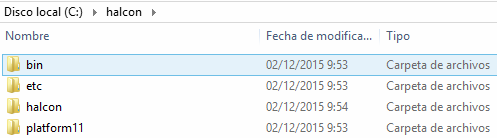
Inside the "bin" folder you will find the Halcón.exe application which you must run to start the installation of the program (on some computers it is necessary to run the application in administrator mode), we suggest creating a shortcut on the desktop for the application.

Once you run the application, wait for the program to finish, it will restart several times to update its content.

Main screen
Note: the visual appearance of the application may vary depending on the operating system it is running on.
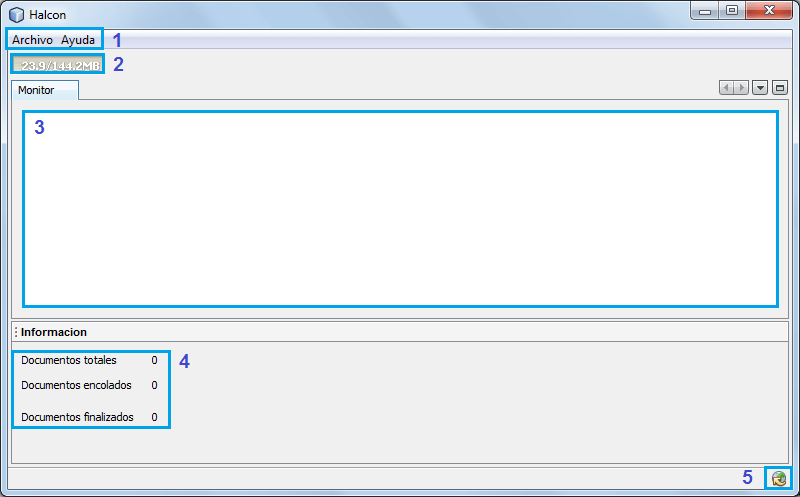
- Menu bar for the use and configuration of the application.
- Tool to measure the use of the application in the computer's RAM.
- Place where every detail that the files in the monitored directory will have will be notified on the screen.
- Tool to account for the application process in real time.
- The icon is displayed if there are updates.
Menu
File Menu
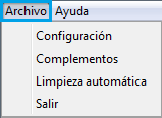
- Settings:Open the settings panel for the app.
- Complements: Panel where you install, update, and uninstall plugins, as well as configure the application proxy.
- Automatic cleaning: this menu option opens to configure the time in which the application will delete information to keep what is stored to a minimum for better performance.
- Exit: Option to stop the application and close it.
Help Menu
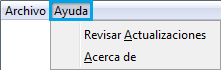
- Check updates: in this option, you can check whether or not some of the plugins have pending updates to be installed.
- About: this option, opens a window showing general information about the application.
Configuration
Standard Configuration
To access the directory configuration panel, you must click on the "Archivo" menu and "Configuración" option.
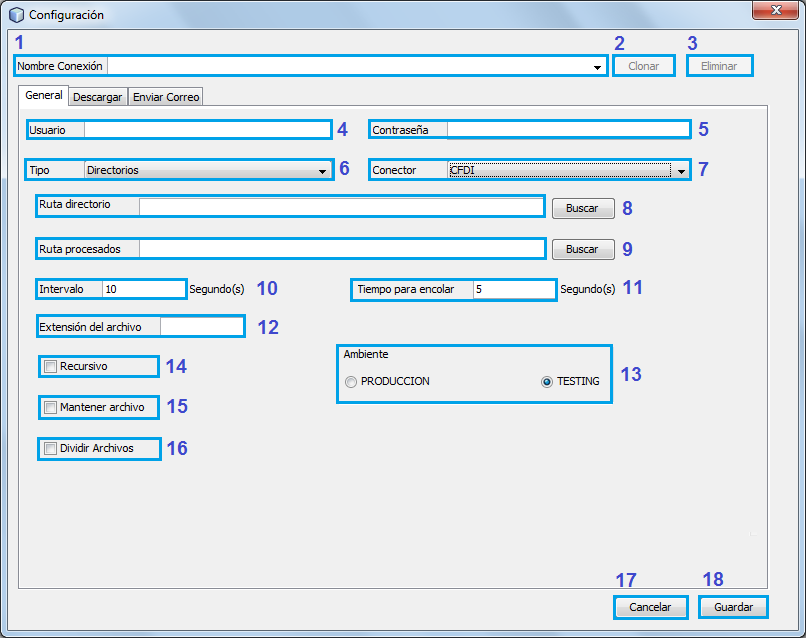
- Nombre conexión: it is a selection field (if there are stored configurations) and writing in which if you want to modify any already saved configuration you only have to change it to the one you want. If you need to add a new connection, you can do so by selecting the "Nueva conexión" section.
- Clonar: button to duplicate the information of the selected configuration.
- Eliminar: button to delete the selected configuration.
- Usuario: text field in which the user with which the application will try to connect to the Webservice is captured.
- Contraseña: field in which the password with which the application will try to connect to the Webservice is captured.
- Tipo: selection field where it is specified how the application will find the elements to send through the Webservice (directory).
- Conector: selection field in which the Webservice through which the information will be sent is chosen.
- Ruta directorio: through the “Buscar” button, a window is displayed in which the directory is selected where the application will search for files that meet the configuration criteria to be processed and sent.
- Ruta procesados: the “Buscar” button displays a window to select the directory in which the successfully processed files will be moved (this only if the “Mantener archivo” option is disabled).
- Intervalo: in this field, write the time it will take for the application to search within the directory configured with the “Ruta directorio” option.
- Tiempo para encolar: field in which the application waiting time is captured before processing the file(s) found in the directory configured in the “Ruta directorio” option.
- Extensión del archivo: in this field the file extension is written, when documents with this extension are found in the configured directory they can be processed depending on their configuration. Some examples of extensions are: XML, TXT, CSV, etc. (the extension should not be written with a period “.”).
- Ambiente: in this section is used to determine whether the application will send the elements found in the directory to the test (TESTING) or production (PRODUCCION) servers.
- Recursivo: checking that when enabled, files that meet the configuration criteria will be searched within the subdirectories.
- Mantener archivo: If this option is enabled, the processed files will be kept in the directory, otherwise the processed files will be moved to the directory configured in option 5 “Ruta procesados”.
- Dividir archivos: Enabling this section shows the options to configure file division:
- Codificación: it is the encoding of the file which will be processed to split it.
- Serie:number that represents the position in which the invoice series is located within a connector file.
- Folio: number that represents the position in which the invoice folio is located within a connector file.
- Ruta Split: through the “Buscar” button, a window is displayed in which the directory to be monitored is selected in search of files that meet the configuration criteria to divide them and store them in the processed directory (this is if the “Mantener archivos” option is disabled, otherwise the files will be kept in the directory).
- Guardar: button to store the settings.
- Cancelar: button to close the configuration window.
Database Configuration
- Nombre conexión: It is a selection field (if there are stored configurations) and writing in which if you want to modify any already saved configuration you only have to change it to the one you want. If you need to add a new connection, you can do so by selecting the "Nueva conexión" section.
- Clonar: button to duplicate the information of the selected configuration.
- Eliminar: button to delete the selected configuration.
- Usuario: text field in which the user with whom the application will try to connect to the Webservice is captured.
- Contraseña: field in which the password with which the application will try to connect to the Webservice is captured.
- Tipo: selection field where it is specified how the application will find the elements to send through the Webservice (JDBC).
- Conector:selection field in which the Webservice through which the information will be sent is chosen.
"Descarga" Tab
To access the download configuration panel, click on the "Archivo" menu, "Configuración" option, then click on the download tab.
Note: this tab will only be enabled if you have installed a plugin that has the option to download either a PDF, XML file or both.
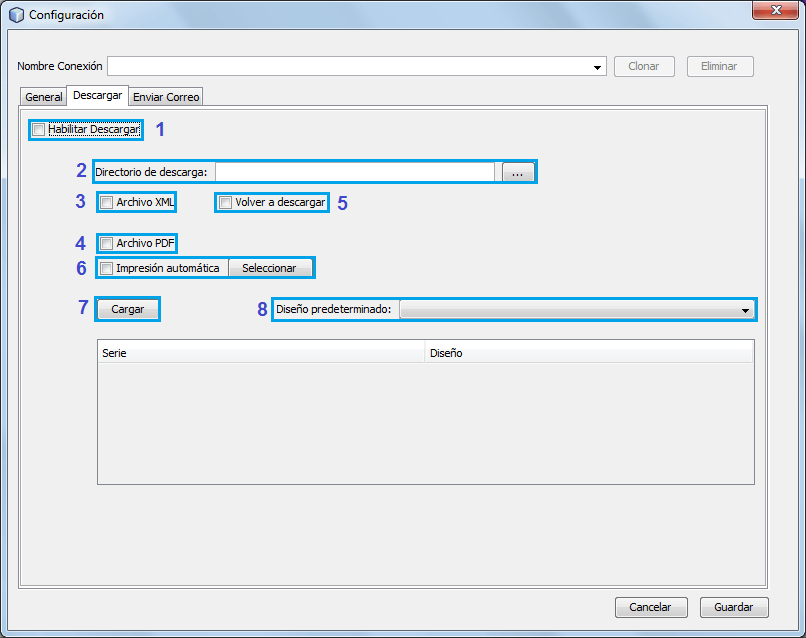
- Habilitar descargar: if this option is enabled, the application will store the information captured in this tab, otherwise the application will understand that you do not want to save any download configuration.
- Directorio descarga: through the "..." button, a window opens in which you select the desired directory to store the files that will be downloaded.
- Archivo XML: if this option is enabled, the XML file will be downloaded.
- Archivo PDF: if this option is enabled, the PDF file will be downloaded.
- Volver a descargar: if this option is enabled you will obtain the ability to redownload the configured files, in case the file being used is added to the folder again with a date change, the application will interpret it as a new one and process it again. Otherwise, if it is not enabled, any file that has been processed will not be downloaded again.
- Impresión automática: By enabling this option, you can configure the printer on which you want to print the documents once downloaded. This configuration is done through the “seleccionar” button, which enables the printing options.
- Cargar: button with which the designs by series of the captured user will be loaded in the "General" tab.
- Diseño predeterminado: in this field, you select the design that will be the default for any series for which a design has not been specified.
"Enviar correo" tab
To access the email sending configuration panel you must click on the "Archivo" menu, "Configuración" option, then click on the send email tab.
Note: this tab will only be enabled if you have installed a plugin that has the option to send by email.
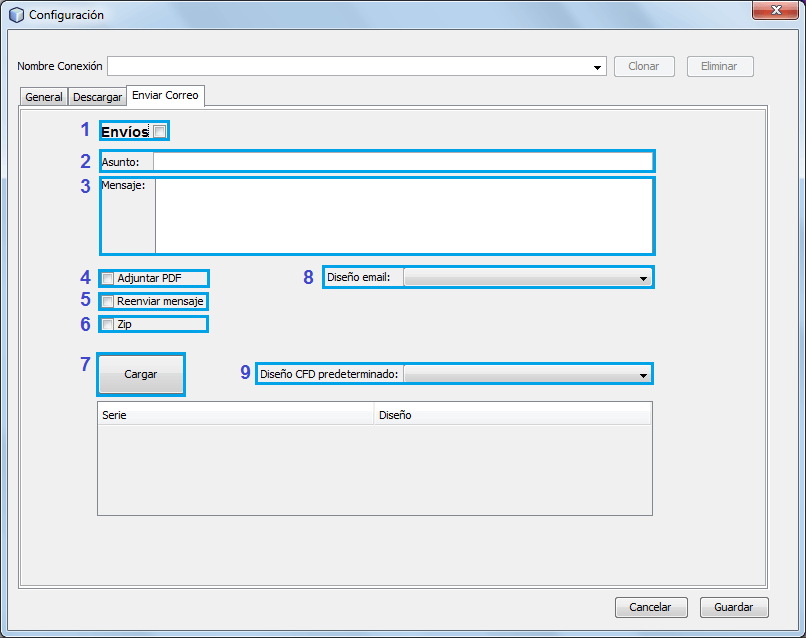
- Envíos: if this option is enabled, the application will store the information captured in this tab, otherwise the application will understand that you do not want to save any configuration for sending mail.
- Asunto: in this field, you capture the subject that you want to display when the email is sent.
- Mensaje: in this field, the message is captured for the body of the email.
- Adjuntar PDF: If this option is enabled, the corresponding PDF file will be attached to the message.
- Reenviar mensaje: select if you require the notification to be sent more than once.
- ZIP: if this option is enabled, the files attached to the email will be sent in ZIP compressed format.
- Cargar: button with which the designs by series and the designs of the captured user's email will be loaded in the "General" tab.
- Diseño email: in this field, you select the design you want for the email that will be sent.
- Diseño CFD predeterminado: in this field, you select the default layout that the PDF file will have.
"Notifica" tab
To access the notification configuration panel you must click on the "Archivo" menu in the "Configuración" option then click on the "notifica" tab.
Note: This tab will only be enabled if you have the "Notificar por correo" plugin installed and notifications will only be sent once the connection panel has been configured, see Notify by Mail.
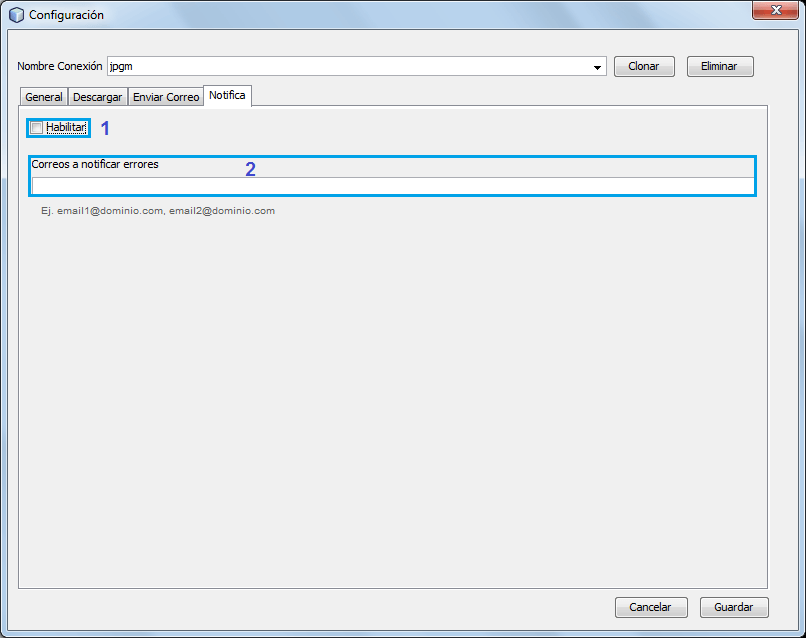
- Habilitar: if this option is enabled, the application will store the information captured in this tab, otherwise the application will understand that you do not want to save any configuration for the email notification.
- Correos a notificar errores: this field captures the email(s) that you wish to notify of file processing errors.
Complements
To access the plugins panel, you must click on the "Archivo" menu on the "Complementos" option.
Updates
The available updates for each plugin installed in the application will appear in this section.
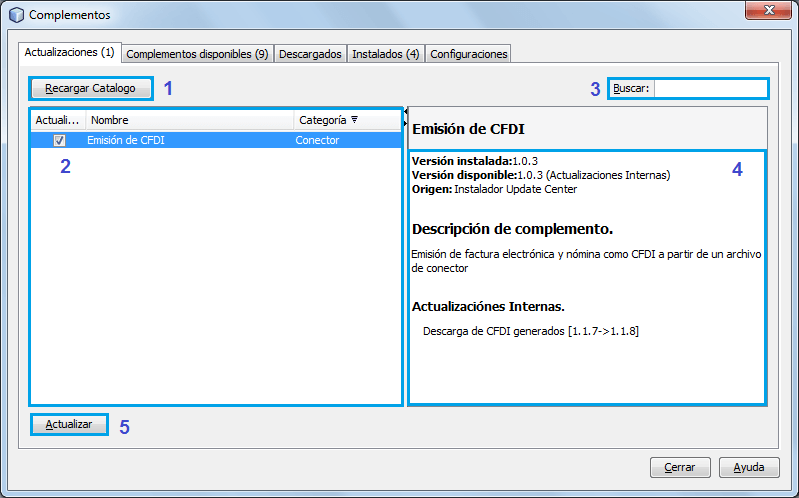
- Button that refreshes updates on the screen.
- This section lists the available updates per plugin.
- Search option to filter updates that comply with what is written.
- This panel describes the information for the selected update.
- Button to update the selected plugins in the update list.
Available Complements
This section lists the complements available to be installed in the application.
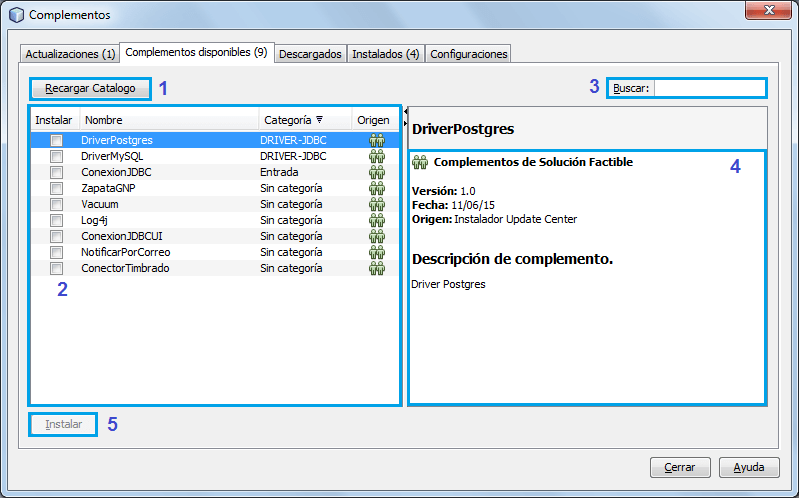
- Button to refresh the accessories catalog.
- List of complements available for installation.
- Option to filter the plugins displayed in the complements list.
- This panel describes the information about the complement to install.
- Button to install the selected complements.
Downloads
This section adds complements that have been downloaded, either to install or update. Generally this option is used in cases where there are problems with the update host.
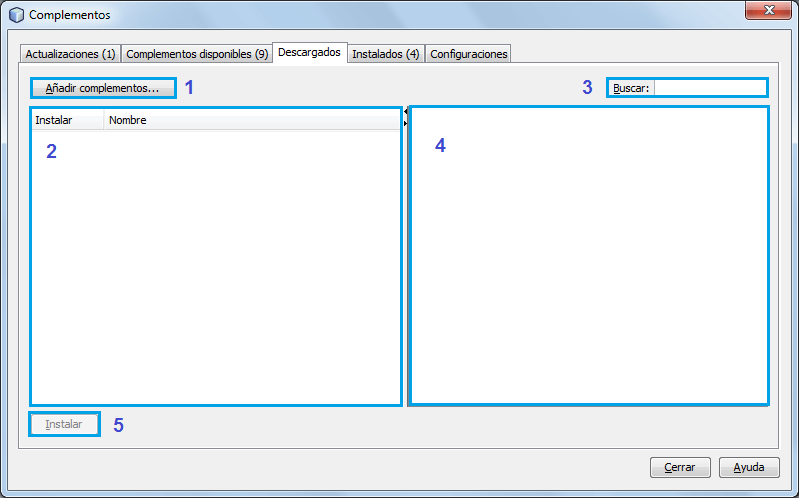
- Button that opens a window in which the file with the extension "nbm" is selected to add it to the list of downloaded complements.
- List of downloaded complements.
- Option to filter the complements displayed in the list of downloaded complements.
- This panel describes the information for the selected complements.
- Button to install or update the selected complement(s).
Installed
This section lists the complements that the application has installed.
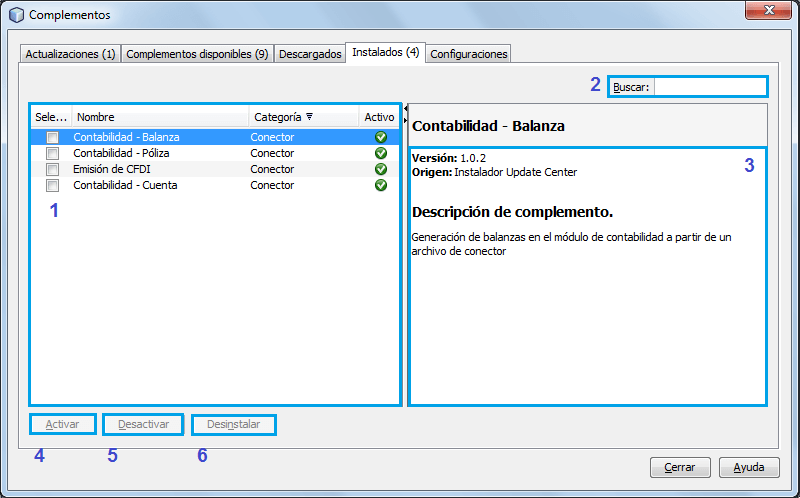
- The complements installed in the application are listed.
- Option to filter the complements shown in the list of installed complements.
- This panel describes the information for the selected complement.
- Button to activate the complement(s) selected in the list of installed complements.
- Button to deactivate the complement(s) selected in the list of installed complements.
- Button to uninstall the complement(s) selected in the list of installed complements.
Settings
Section in which you can make advanced configurations of the application.
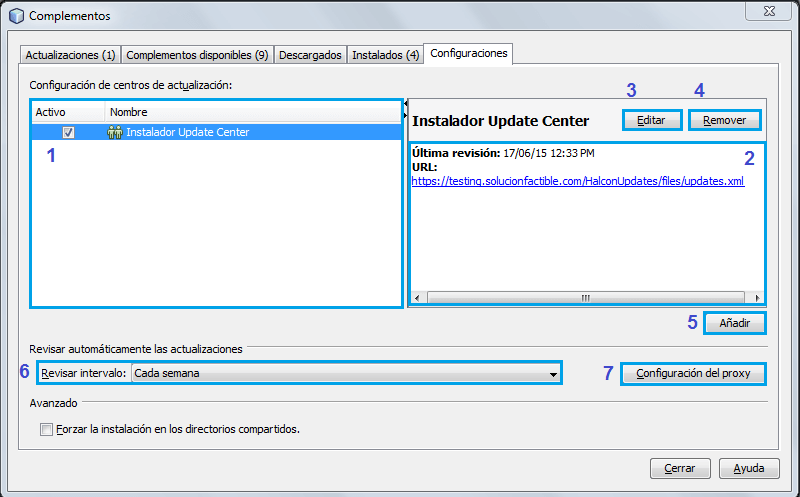
- This panel lists the hosts where the search for complements will be carried out, either for installation or update.
- Information for the selected update host is displayed.
- Button in which a window will be displayed to edit the update host information.
- Button to clear update host configurations.
- Button to add a new update configuration.
- Field to select the frequency you want the application to automatically check for updates of your complements (plug ins).
- Button that opens the window in which the proxy can be configured.
Automatic cleaning
To access this option is through the "Archivo" menu, option "Limpieza automática". With this plugin you can configure the time in which the application will delete information to keep the disk storage to a minimum and thus have better performance.
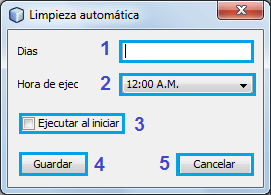
- This field captures the desired number of days for the application to clean the information.
- In this field, select the desired time for the application to begin cleaning every time the period of time configured in the "Días" field expires.
- If this option is enabled, the information will be cleaned every time the application is started, otherwise it will only be done when the configured time period expires at the specified time.
- Click the button to save the selected settings.
- Click the button to cancel without saving any changes.
Complement installer
To access this panel you must click on the "Ayuda" menu on the "Revisar actualizaciones" option.
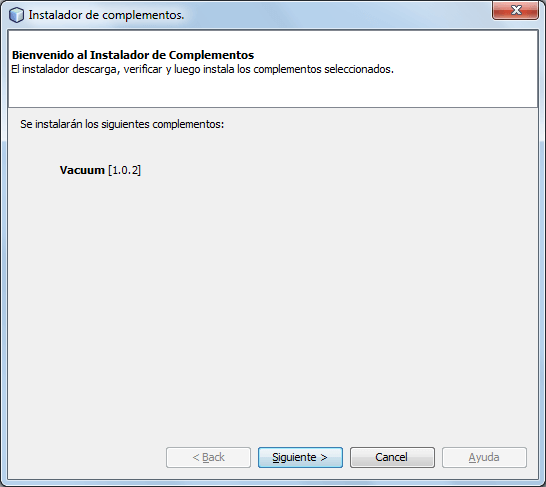
In this option you can check if the installed add-ons have any pending updates and if they do, you can install them from this window.
Log Configuration
To access this configuration panel you must click on the "Archivo" menu. Once the menu is displayed, click on the "Configuración" option of the log.
Note:This is an additional complement, it will only be accessible if you have it installed.
General tab
In this tab you configure what you want to display in the log in addition to the date format.
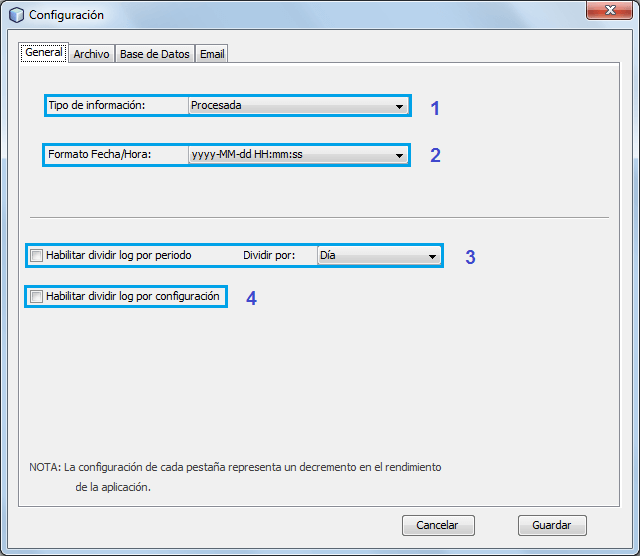
- Tipo de información: in this field you select the information to be displayed on the application monitor as well as the information to be stored in the log.
- Procesada: with this option, the information displayed will only be the responses of each of the processed files, that is, whether they were carried out correctly or if there was an error.
- Toda: with this option, each message issued by the application will be shown in detail.
- Formato de fecha y hora: in this field you select the format of the date and time to be displayed on the application monitor as well as the information stored in the log.
- Habilitar dividir log por periodo: select if the log file is required to be divided by period.
- Dividir por: how to select whether to enable dividing by period in the log by day or month.
- Habilitar dividir log por configuración: select whether the log file is required to be divided by each of the company connectors.
File tab
In this tab, you configure whether you want to store the log in a file (by default, the application stores the log in a file in the path where the application is executed, sfconfig/log/log.txt).

- Habilitar: if this option is enabled, the application will save the log in a file.
- Ruta: this is the path where the log will be stored, the path is selected through the "..." button which displays a window to select the path.
- Nombre: shows the name by which the file will be identified.
Database tab
In this tab, you configure whether you want to store the log in the database.
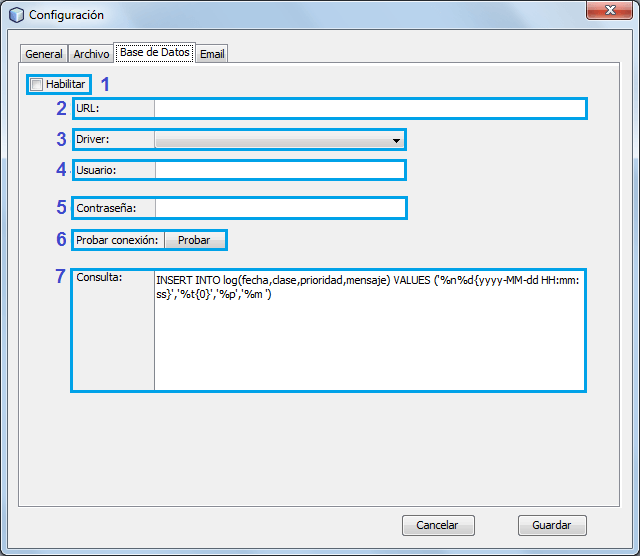
- Habilitar: if this option is enabled, the application will save the log in the database.
- URL: is the connection string to the database in which you want to store the log. For example: jdbc:postgres://192.168.1.1/base_datos.
- Driver: in this field, you select the database driver to use, for example: Postgres, MySQL, SQLite.
- Note: the drivers listed in this option are installed as complements.
- Usuario: in this field, the user is captured for the connection to the database.
- Contraseña: in this field, the password for the connection to the database is captured.
- Probar conexión: through the "Probar" button, the application performs a test to check if the information captured is correct and communication can be established with the database.
- Consulta: in this field, write the query that will be executed each time the application is going to make a log entry to the database.
Email tab
In this tab, you configure whether you want to send the log by email.
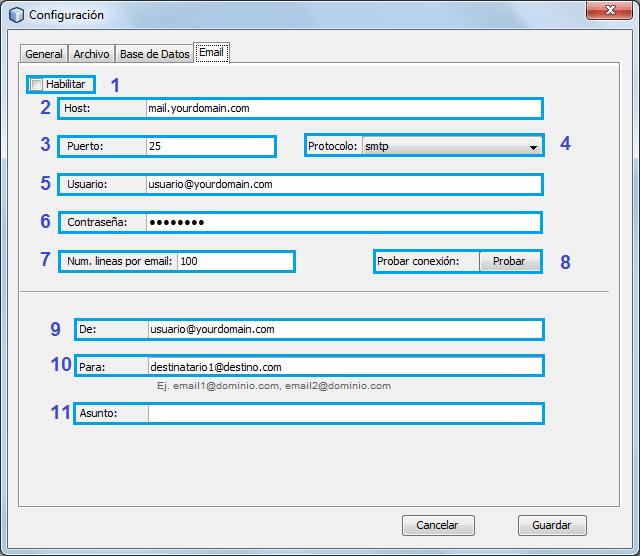
- Habilitar: if this option is enabled, the application will send the log by email.
- Host: email domain.
- Puerto: port for connection.
- Protocolo: connection protocol.
- Usuario: authentication user.
- Contraseña: password for authentication.
- Número de líneas por email: this field captures the number of lines that will be sent by mail. Every time the application buffer reaches the configured number of lines, the application will release this information by sending it by mail.
- Probar conexión: through the "Probar" button, the application will check if the information captured is correct.
- De: It is the sender's email.
- Para: is the recipient's email, there can be more than one by separating the emails with a comma ",".
- Asunto: message to be displayed as the subject of the message.
Notify by email
To access the email notification configuration panel, you must click on the "Archivo" menu, then click on the "Notificar por correo" option.
In this panel, you can configure the information necessary for the application to send by email if an error occurs in the files that have been processed.
Note: This is an additional complement, you will only be able to access it if you have it installed.
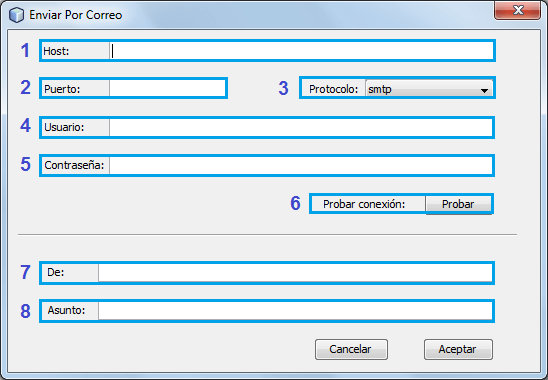
- Host: email domain.
- Puerto: port for the connection.
- Protocolo: connection protocol.
- Usuario: authentication user.
- Contraseña: password for authentication.
- Probar conexión: through the "Probar" button the application will check if the information captured is correct.
- De: it is the sender's email.
- Asunto: message that will be displayed as the subject of the message.
