
Add a reference to a Webservice in Visual Studio 2010
Consuming a Webservice from VisualStudio is very easy, since it contains visual tools to generate the necessary classes and files. We only need to make a few small configurations to be able to make calls to the testing and production servers from any .NET language that VisualStudio supports (C# .NET, VB .NET, etc.).
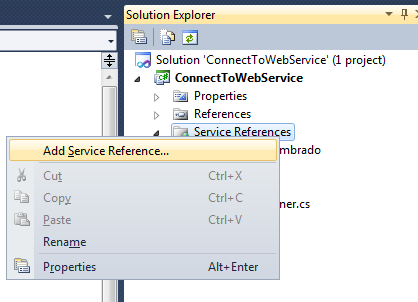
Step 1
Select the project to add the ServiceReference.
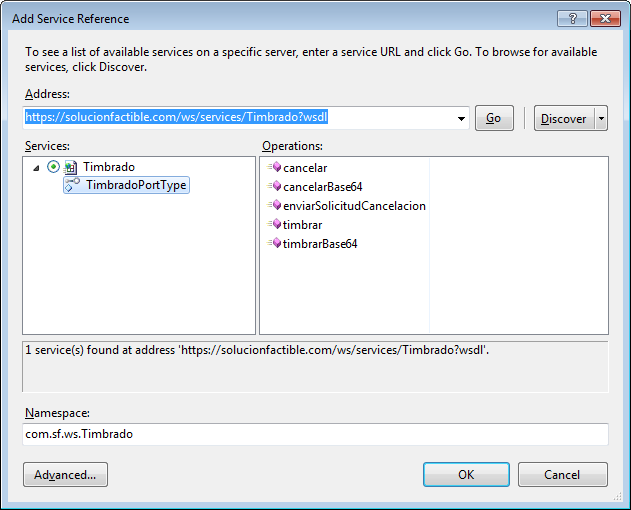
Step 2
Enter the URL and specify the namespace to identify the objects.
Step 3
When the reference is added, data about the Endpoint is generated in a file called: app.config which is located in the project folder where the reference was added, in this case it is in:.../Visual Studio 2010/Projects/ConnectToWebService/ConnectToWebService/app.config
This file must be modified to connect to the production and testing Web service by simply changing the "Endpoint" name we'll be using.
Open the app.config file and identify the section in the code excerpt shown below, adding the highlighted text:
Note: the namespace "com.sf.ws.Timbrado." should be replaced with the name you gave it when adding the "ServiceReference" in step 2.
Some parts of the file have been omitted.
Download the full file app.config
Step 4
Once the configuration is done in the app.config file, we can consume the Webservice for testing and production. Below is a code extract:
C# .NET Code Example - Timbrado WebService
bool produccion = false;
string prod_endpoint = "TimbradoEndpoint_PRODUCCION";
string test_endpoint = "TimbradoEndpoint_TESTING";

//If you receive error 417 you must uncomment the line below
//System.Net.ServicePointManager.Expect100Continue = false;

//The package or namespace in which the classes are located
//It will be the one defined when adding the reference to the WebService,
//in this example it is: com.sf.ws.Timbrado

com.sf.ws.Timbrado.TimbradoPortTypeClient portClient = null;
portClient =  (produccion)
    ? new com.sf.ws.Timbrado.TimbradoPortTypeClient(prod_endpoint)
    : portClient = new com.sf.ws.Timbrado.TimbradoPortTypeClient(test_endpoint);

try
{
    byte[] bytes = Encoding.UTF8.GetBytes(System.IO.File.ReadAllText(@"C:\Users\Solucion\Downloads\Facturas2\Factura2.xml"));
    System.Console.WriteLine("Sending request...");
    System.Console.WriteLine("EndPoint = " + portClient.Endpoint.Address);
    com.sf.ws.Timbrado.CFDICertificacion response = portClient.timbrar("testing@solucionfactible.com", "timbrado.SF.16672", bytes, false);

    System.Console.WriteLine("Información de la transacción");
    System.Console.WriteLine(response.status);
    System.Console.WriteLine(response.mensaje);
    System.Console.WriteLine("Resultados recibidos" + response.resultados.Length);
    com.sf.ws.Timbrado.CFDIResultadoCertificacion[] resultados = response.resultados;

    //Classes to be used in cancellation:
    //com.sf.ws.Timbrado.CFDICancelacion
    //com.sf.ws.Timbrado.CFDIResultadoCancelacion

}
catch (Exception ex)
{
    System.Console.WriteLine(ex.StackTrace);
}
The highlighted lines in the code above refer to the attribute: name="TimbradoHttpsSoap11Endpoint of each endpoint configured in the app.config file.
Troubleshooting
Error message: "unrecognized attribute decompressionenabled"
The "decompressionenabled" attribute is only recognized if the project is configured to use NetFramework4, otherwise, you just have to open the app.config file and remove this attribute that should be inside a tag:: <httpsTransport/>
Error message:
"The endpoint element with the name
'TimbradoEndpoint_TESTING' and the contract 'SolucionFactible.TimbradoPortType'
was not found in the ServiceModel client configuration section".
It can also be displayed as:
"Could not find endpoint element with name 'TimbradoEndpoint_TESTING' and contract
'SolucionFactible.TimbradoPortType' in the ServiceModel client configuration section ..."
In a Visual Studio Solution with multiple projects, you must ensure that the endpoint configuration exists in the App.config of the project designated as the main project, as this is the one that is loaded when the application starts.
Error message:
"The maximum size quota for incoming messages (65536) has been exceeded."
To increase the quota, use the MaxReceivedMessageSize property on the corresponding binding element, or add a new webHttpBinding node that applies to all bindings.
<webHttpBinding>
<binding maxBufferSize="2147483647" maxReceivedMessageSize="2147483647" />
</webHttpBinding>
