Tags: configuration, email
Lesson ID-106.8.1
Updated to:
05/02/2026
Lesson objective
The user should be able to configure an email account to send their invoices from a domain specified by the customer.
Email settings
To configure an email account, you must first log in to the system as instructed in lesson ID-101.1
Once inside the system, go to the control panel and select the "Settings" option located at the top of the portal.

Next, click on the "Configuración de correos" option and then press "Configurar servidor".

The following configuration window will be displayed.
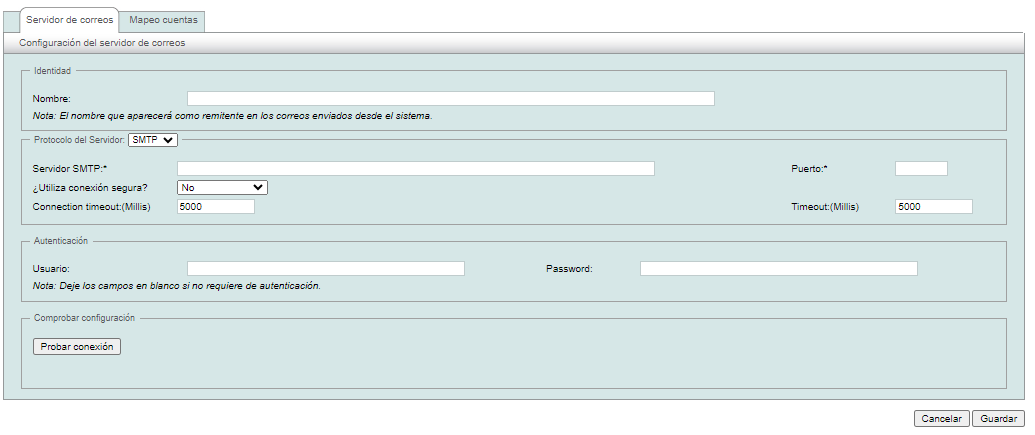
In this form, you must specify a value for each field; the fields are described individually below.
Nombre (Name). This is the value that will be displayed as the sender in emails sent from the system.
Protocolo del Servidor (Server Protocol). It is the protocol used for sending emails (SMTP).
Servidor SMTP (SMTP server). You must specify the domain of your email provider. Examples: Smtpauth.earthlink.net, Smtp.gmail.com, Outbound.att.net, Smtp.live.com, etc.
¿Utiliza conexión segura? (Do you use a secure connection?). In this section, you must specify the security type for your SMTP server. The options are: TLS, SSL, STARTTLS, STARTTLS 1.2, TLS 1.2.
Puerto (Port). You must specify the connection port for your SMTP server.
Connection timeout (Millis). Estimated connection time in milliseconds.
Timeout:(Millis). The waiting time during which the system uses the connection.
Usuario (User). Username for connecting to your SMTP server.
Password. Password for accessing the SMTP server.
After filling in the required information, you can test the connection by clicking the “Probar Conexión” button. A message confirming a successful connection will be displayed; otherwise, the corresponding error message will appear, in which case you will need to review the previous settings.

Once the connection has been tested, go to the "Mapeo cuentas" section.

In this section, you must define the email account that will be displayed for sending emails from the Solución Factible portal.
Each column is described as follows:
Note: The asterisk (*) symbol is used to replicate the value in the following rows of this configuration.
User ERP: Username active on the Solución Factible portal.
Email ERP: User account registered for access and issuance of invoices on the Solución Factible portal.
From: The email account that will be displayed in the sender field of the sent email.
Reply: The email address that will be displayed in the "contestar a" field of the sent email.
User: User account for connecting to the SMTP server.
Pass: The user account password required to connect to the SMTP server.
Finally, click on the "Guardar" button located at the bottom of the page.
You can test the configuration by sending a test email from the portal; to do this, please review lesson ID-103.6. The email you receive should include the previously configured accounts.
If you experience any problems, please check that your email service can receive email sending instructions, and also verify the necessary settings with your SMTP provider.
